Markings In My Journal

Visit my other site, Markings In My Journal, for more inspiration.

Wednesday, February 19, 2014

Pin Picks 3...

A couple days late on this this, but I saw some fun stuff so I wanted to post them :) and I hope to get some fun, "original" material posted next week!

(Disclaimer: These are pictures that I have placed on my pin boards and they are inspiring and interesting to me...however, that does not mean that I have visited or endorse the sites that the original pin may take you to if you follow the pin back to it's source. These pictures are linked to the pin on Pinterest.)

Crafty Time:
crazy mom quilts: contact print pillow (a tutorial)

Good Eats:
Cook pasta to al dente, drain. Sauté garlic and green onions in veg oil and a little sesame oil. (and 1TBSP red pepper flakes if you like heat) Toss in pasta and 1/4 cup Soy sauce and sesame seeds. Cook 2 minutes tossing frequently and you have perfect Lo mien!.

Enjoy the View:
The Great Wall of China
Cool Clothes:
scallop trim slip, love thi

Homey Spaces:
http://media-cache-ak0.pinimg.com/originals/fc/92/e2/fc92e2571579e4ebee997e51a1a7e5a5.jpg
Variety Mine:

These are only a few of the pins on my boards...if you are interested in seeing more of my pins, here is a link to my Pinterest boards...or you can get there from the button the side my blog site
Hope you were inspired too!

Amanda
"And ye shall be holy unto me: for I the LORD am holy, and have severed you from other people, that ye should be mine" ~ Leviticus 20:26

Thursday, February 13, 2014

Desk Accessory Set...

Last week I made this desk accessory set for a family member's birthday... I had to make them on my old Jenome machine as my newer, fancier :) Singer was in the shop getting fixed. I got the Singer back yesterday...so I hope to be able to see how it is running some time today! But the Jenome did a great job filling in!

As for the Desk Accessory Set, it included a key board wrist rest (with the option of using it as a heat pack too!), reverse-applique leafy branch mug rug, pen cup, and a paper clip cup, which also had some mini post it notes in it...
Beautifying a desk makes the work seem less blah, right?! :)

Amanda
"A little that a righteous hath is better than the riches of many wicked."
~ Psalm 37:16

Monday, February 10, 2014

Pin Picks 2...


Welcome to the second week of my sharing a small sampling of recent pins that I found inspiring on Pinterest. During the past week I logged more than 3,000 pins...so glad this virtual filing cabinet is easier to use than a real filling cabinet!

(Disclaimer: These are pictures that I have placed on my pin boards and they are inspiring and interesting to me...however, that does not mean that I have visited or endorse the sites that the original pin may take you to if you follow the pin back to it's source. These pictures are linked to the pin on Pinterest.)

Crafty Time:
Very cool disappearing nine patch #autumn #fall

Good Eats:
SUPER EASY Sweet Hawaiian Bread  Bread Machine Recipe-•3/4 cup pineapple juice   •1 eggs   •2 tablespoons vegetable oil   •2 1/2 tablespoons honey   •3/4 teaspoon salt   •3 cups bread flour   •2 tablespoons dry milk   •2 teaspoons fast rising yeast or 2 teaspoons quick-rising yeast

Enjoy the View:
Love the patchwork design on the signs for the Winter OLYMPICS 2014  -- Quilt Olympics by Moda... the Cutting Table.
Cool Clothes:
Maxi. Print. Style.

Homey Spaces:
.
Variety Mine:

These are only a few of the pins on my boards...if you are interested in seeing more of my pins, here is a link to my Pinterest boards...or you can get there from the button the side my blog site
Hope you were inspired too!

Amanda
"The children of Israel brought a willing offering unto the LORD, every man and woman, whose heart made them willing to bring for all manner of work, which the LORD had commanded to be made by the hand of Moses." ~ Exodus 35:29

Monday, February 3, 2014

Pin Picks...

This is a new feature I'd like to start doing weekly...sharing a small sampling of recent pins that I found inspiring on Pinterest. I find a lot of inspiring images there and a great many recipes...it's like a virtual filing cabinet!

(Disclaimer: These are pictures that I have placed on my pin boards and they are inspiring and interesting to me...however, that does not mean that I have visited or endorse the sites that the original pin may take you to if you follow the pin back to it's source. These pictures are linked to the pin on Pinterest.)

Crafty Time:
.

Good Eats:
buy a bag of ravioli and then bake them in the oven! Crispy ravioli and marinara sauce.

Enjoy the View:
st maarten

Cool Clothes:
"Made for my mom." by adriannegaliher ❤ liked on Polyvore

Homey Spaces:
<3

Variety Mine:
this is called a swedish flame. make your cuts like you're cutting cake. leave about 6 inches at the base. throw some fuel oil in there. (about a cap full.) it burns up to two to three hours.

These are only a few of the pins on my boards...if you are interested in seeing more of my pins, here is a link to my Pinterest boards...or you can get there from the button the side my blog site
Hope you were inspired too!

Amanda
"Then Jesus answered and said unto her, O woman, great is thy faith: be it unto thee even as thou wilt. And her daughter was made whole from that very hour." ~ Matthew 15:28

Wednesday, January 29, 2014

Weekly Planner...

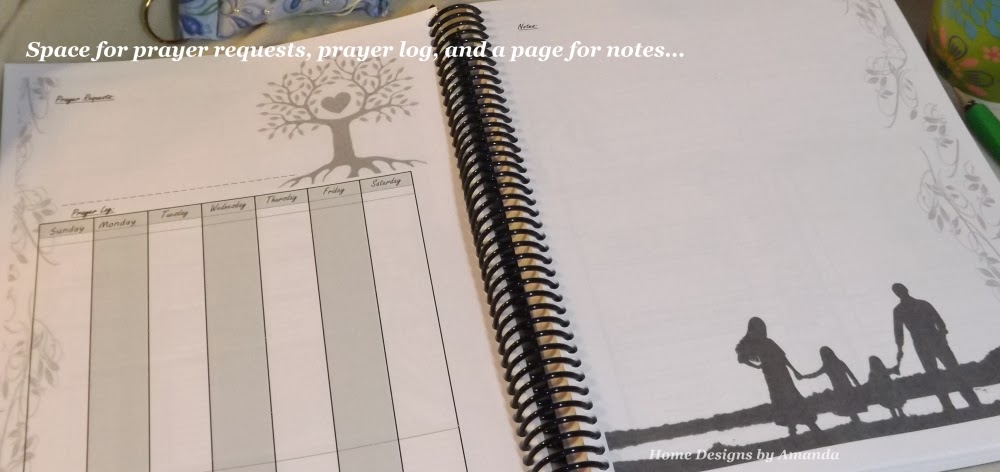
I've always liked looking at different types of day planners and seeing if they'd work for me...but I don't usually ever buy one! For 2012, I just used a monthly planner calendar from the dollar store...worked pretty good, but those little blocks get filled up quick... In 2013, I tried a variety of things...mostly different printouts I'd make, until about September, then I started using a basic tablet. This worked well, and I liked it, and was even expanding it to use two pages per week instead of one....but the issue was that I had to make all the lines, dates, checklists, etc. every week.

Well, at the beginning of the year I saw this and this post on A Holy Experience and took those inspirational ideas of a manifesto and daily planner and made my own .

So, the first post was about a "manifesto" for the upcoming year to have a direction and goals to work toward...well, I wrote mine out and it became Blueprint 14. Since a printable to go with a manifesto is rather personal, I went to Tagxedo and made one for Blueprint 14!
So from this, I needed a daily planner that covered all the checklists I need :) However, I prefer a week together at a time...so, I came up my sheets, printed them out, and put them in a 3 ring binder...

Liking the thought of having it bound more like a tablet then in a 3-ring binder... for my birthday (last week), I asked for a bound copy of the sheets to last a year...

My loving husband said ok, so, I tweaked the pages to make sure they were exactly what I wanted, added some nice graphics, uploaded it to Staples, and viola...it came in the mail on Monday!
Obviously, opting for black and white was more economical and I think silhouettes are pretty neat!


Here are the pages per a week...
then repeated to last a year!

Once I got it, I've found a couple very minor things that need tweaked and had ideas for the graphics to go with the season... but those will have to wait till next year, if I decide to produce my own planner again, which is highly possible :) And I'm sure by then I'll have some things that I'll want to add/take off of this years planner. Also, it is rather thick, so depending on the pricing, I'm thinking that dividing it into 1/2 year increments would be nice too!

But I am really excited...it is very neat to have the whole year right there ready to use, on such nice paper (and I chose the lowest quality option, lol), and so personalized!

Amanda
"A man's heart deviseth his way, but the LORD directeth his steps." ~ Proverbs 16:9


Wednesday, January 22, 2014

Pretty Pink...

Today I clicked over to Stitched in Color and saw that she is currently hosting a giveaway with Sew Modern fabric shop. It is a contest where you make a mosaic of fabric in a particular color scheme carried by the shop, Sew Modern this time, and you could win a fat quarter pack of your material if you win.

 The color is PINK! Here are my fabric choices...
Just got to love perusing fabric! If you want to join in, there is still time but better hurry, entry submission ends tomorrow night!

Amanda
"Let your light so shine before men, that they may see your good works, and glorify your Father which is in heaven." ~ Matthew 5:16

Monday, January 20, 2014

Accessories Tutorial...

Today I have a tutorial that was requested after I posted about the purse accessory set. I had planned on posting it this past Thursday, but whew, I forgot how much more time a tutorial took than a regular post...so, it just didn't happen till now! :)

Note: There are a lot of picture in this post! Also, I try to write my tutorials for a beginners level :) that way if someone has no sewing experience they can try to make one too!

Supplies needed:

2 pieces of material 7 1/2" x 11 1/2" each (tissue cover)
2 pieces of material 5" x 11" each (change purse)
thread
snap fastener and/or button
tissue pack :)
sewing machine
ruler

Travel Tissue Cover
Start by cutting your 2 pieces of fabric to 7 1/2" x 11 1/2"
Take each each piece of your tissue cover and fold it down from shorter side in 2 inches (right sides of fabric facing each other). Note: Both the cover and lining will be constructed the same way, except the space left unsewn in the side seam of the lining...
 Then turn them up a 1/2 inch
Bring the other end up to meet the edge of the material, pin sides down if you'd like...
 
Now you can sew the sides...make sure to lift your foot and needle over the flaps...DO NOT SEW THEM DOWN! Also, here is where you need to leave a small section (~1 1/2") of one side seam of the lining unsewn....this is for turning once we've sewn the lining to the outside.
Here is what your two pieces should look like now...
Now we are going to turn the lining right side out and put it into the outer section...
Once the lining is in the outer shell, line up the flaps and sew both sides...
Now, pull out the lining, find the hole left in the side, and pull everything out from there to make it right side out... don't forget to sew up the hole in your lining before tucking it into the cover.
Admire your nice, new Travel Tissue Cover...

Mini Change Purse
Start by cutting your 2 pieces of fabric to  5" x 11"
Take each each piece of your change purse and fold it in from the shorter side 4 inches (right sides of fabric facing each other). Note: Both the cover and lining will be constructed the same way, except the space left unsewn in the side seam of the lining...
Sew the side seams, remembering to leave ~ 1 1/4" unsewn on one seam of the lining...but make sure it an 1 1/4" from the fold so we can make our square bottom...
Now, we are going to make the boxed bottom... take the side seams and meet them on the inside.
The bottom should flatten and the seams point...take the point and measure up the seam 1", place a pin here to keep your measurement. Do this to all four "corners"... and sew along the pin line.
Once sewn, cut off triangles...
See the cut squared bottoms :) Now, turn the lining right side out and put into the outside.
Line up the flap edges and round them...I used my drunkards path template to do my rounding. Then, sew all the way around the opening (sewing the lining to the outside).
Once sewn, find the hole in the lining and pull everything right side out through there. Don't for get to sew up the hole in the lining before putting it into the outside.
Sew again around the whole opening.
Now to add the snap...usually I would use a 4 piece snap set with the snap pliers, however, I don't have any full sets left, so I used a 2 piece sew on snap set with a button decoration on the outside to hide the thread. You could also make this a button closure if you don't mind doing button holes and want it to open that way :)
Your purse now has some very cute items to help keep you organized!
Hope you enjoyed this tutorial and if you have any questions, just ask!

Amanda
"The LORD will perfect that which concerneth me; thy mercy, O LORD, endureth for ever: forsake not the works of thine own hands." ~ Psalm 138:8