Markings In My Journal

Visit my other site, Markings In My Journal, for more inspiration.

Wednesday, January 29, 2014

Weekly Planner...

I've always liked looking at different types of day planners and seeing if they'd work for me...but I don't usually ever buy one! For 2012, I just used a monthly planner calendar from the dollar store...worked pretty good, but those little blocks get filled up quick... In 2013, I tried a variety of things...mostly different printouts I'd make, until about September, then I started using a basic tablet. This worked well, and I liked it, and was even expanding it to use two pages per week instead of one....but the issue was that I had to make all the lines, dates, checklists, etc. every week.

Well, at the beginning of the year I saw this and this post on A Holy Experience and took those inspirational ideas of a manifesto and daily planner and made my own .

So, the first post was about a "manifesto" for the upcoming year to have a direction and goals to work toward...well, I wrote mine out and it became Blueprint 14. Since a printable to go with a manifesto is rather personal, I went to Tagxedo and made one for Blueprint 14!
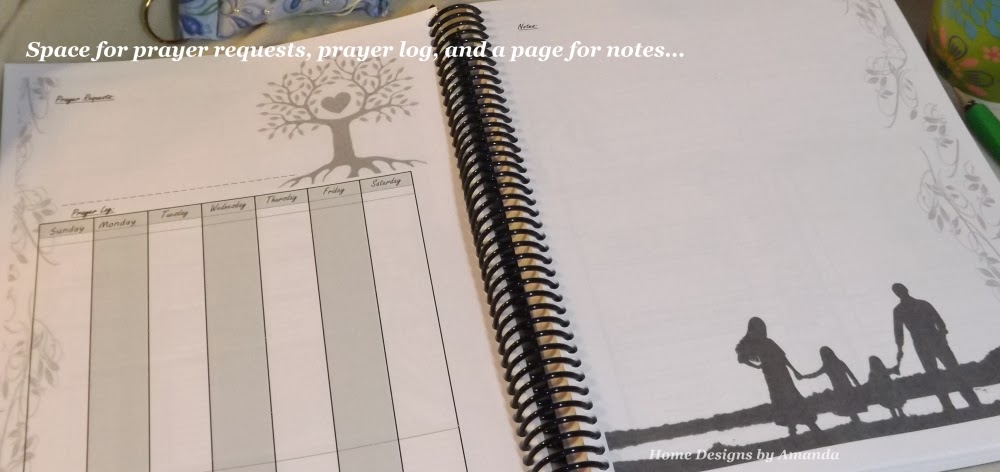
So from this, I needed a daily planner that covered all the checklists I need :) However, I prefer a week together at a time...so, I came up my sheets, printed them out, and put them in a 3 ring binder...

Liking the thought of having it bound more like a tablet then in a 3-ring binder... for my birthday (last week), I asked for a bound copy of the sheets to last a year...

My loving husband said ok, so, I tweaked the pages to make sure they were exactly what I wanted, added some nice graphics, uploaded it to Staples, and viola...it came in the mail on Monday!
Obviously, opting for black and white was more economical and I think silhouettes are pretty neat!


Here are the pages per a week...
then repeated to last a year!

Once I got it, I've found a couple very minor things that need tweaked and had ideas for the graphics to go with the season... but those will have to wait till next year, if I decide to produce my own planner again, which is highly possible :) And I'm sure by then I'll have some things that I'll want to add/take off of this years planner. Also, it is rather thick, so depending on the pricing, I'm thinking that dividing it into 1/2 year increments would be nice too!

But I am really excited...it is very neat to have the whole year right there ready to use, on such nice paper (and I chose the lowest quality option, lol), and so personalized!

Amanda
"A man's heart deviseth his way, but the LORD directeth his steps." ~ Proverbs 16:9


Wednesday, January 22, 2014

Pretty Pink...

Today I clicked over to Stitched in Color and saw that she is currently hosting a giveaway with Sew Modern fabric shop. It is a contest where you make a mosaic of fabric in a particular color scheme carried by the shop, Sew Modern this time, and you could win a fat quarter pack of your material if you win.

 The color is PINK! Here are my fabric choices...
Just got to love perusing fabric! If you want to join in, there is still time but better hurry, entry submission ends tomorrow night!

Amanda
"Let your light so shine before men, that they may see your good works, and glorify your Father which is in heaven." ~ Matthew 5:16

Monday, January 20, 2014

Accessories Tutorial...

Today I have a tutorial that was requested after I posted about the purse accessory set. I had planned on posting it this past Thursday, but whew, I forgot how much more time a tutorial took than a regular post...so, it just didn't happen till now! :)

Note: There are a lot of picture in this post! Also, I try to write my tutorials for a beginners level :) that way if someone has no sewing experience they can try to make one too!

Supplies needed:

2 pieces of material 7 1/2" x 11 1/2" each (tissue cover)
2 pieces of material 5" x 11" each (change purse)
thread
snap fastener and/or button
tissue pack :)
sewing machine
ruler

Travel Tissue Cover
Start by cutting your 2 pieces of fabric to 7 1/2" x 11 1/2"
Take each each piece of your tissue cover and fold it down from shorter side in 2 inches (right sides of fabric facing each other). Note: Both the cover and lining will be constructed the same way, except the space left unsewn in the side seam of the lining...
 Then turn them up a 1/2 inch
Bring the other end up to meet the edge of the material, pin sides down if you'd like...
 
Now you can sew the sides...make sure to lift your foot and needle over the flaps...DO NOT SEW THEM DOWN! Also, here is where you need to leave a small section (~1 1/2") of one side seam of the lining unsewn....this is for turning once we've sewn the lining to the outside.
Here is what your two pieces should look like now...
Now we are going to turn the lining right side out and put it into the outer section...
Once the lining is in the outer shell, line up the flaps and sew both sides...
Now, pull out the lining, find the hole left in the side, and pull everything out from there to make it right side out... don't forget to sew up the hole in your lining before tucking it into the cover.
Admire your nice, new Travel Tissue Cover...

Mini Change Purse
Start by cutting your 2 pieces of fabric to  5" x 11"
Take each each piece of your change purse and fold it in from the shorter side 4 inches (right sides of fabric facing each other). Note: Both the cover and lining will be constructed the same way, except the space left unsewn in the side seam of the lining...
Sew the side seams, remembering to leave ~ 1 1/4" unsewn on one seam of the lining...but make sure it an 1 1/4" from the fold so we can make our square bottom...
Now, we are going to make the boxed bottom... take the side seams and meet them on the inside.
The bottom should flatten and the seams point...take the point and measure up the seam 1", place a pin here to keep your measurement. Do this to all four "corners"... and sew along the pin line.
Once sewn, cut off triangles...
See the cut squared bottoms :) Now, turn the lining right side out and put into the outside.
Line up the flap edges and round them...I used my drunkards path template to do my rounding. Then, sew all the way around the opening (sewing the lining to the outside).
Once sewn, find the hole in the lining and pull everything right side out through there. Don't for get to sew up the hole in the lining before putting it into the outside.
Sew again around the whole opening.
Now to add the snap...usually I would use a 4 piece snap set with the snap pliers, however, I don't have any full sets left, so I used a 2 piece sew on snap set with a button decoration on the outside to hide the thread. You could also make this a button closure if you don't mind doing button holes and want it to open that way :)
Your purse now has some very cute items to help keep you organized!
Hope you enjoyed this tutorial and if you have any questions, just ask!

Amanda
"The LORD will perfect that which concerneth me; thy mercy, O LORD, endureth for ever: forsake not the works of thine own hands." ~ Psalm 138:8

Wednesday, January 15, 2014

Map Time Rag Quilt...

Another Christmas present review... this soft, snugly blanket was made for our nephew. He turned a year old a few days before Christmas, which was what this present was originally meant for :) but I hadn't had the chance to make it! 

So, he received his intended Christmas present for his birthday...and I used the much need couple days in between to make the quilt...which he in turn received for Christmas!

Thankful to my wonderful husband who took care of snipping all the edges of the rag quilt for me while I wrapped presents on Christmas Eve!

Finished quilts have been few in number around here lately, so I don't think I remembered to measure the finished size...but I did do a little different pattern than a regular rag quilt so there would be a nice size map in the middle! (All the flannel is from JoAnn's.)

Have you completed any quilts lately?

Amanda
"But it is good for me to draw near to God: I have put my trust in the Lord God, that I may declare all thy works." ~ Psalm 73:28


Saturday, January 11, 2014

Daily Discovery...

A couple of years ago we began using Bible Reading schedules for reading through the Bible in one year...well, this year we are moving from a basic reading schedule to reading Chronologically through the Bible this year. I was excited to start the new schedule, however, I didn't want to just read through it, I want to get more out of it then in previous years...

So, this is what I came up with:
In the fall I started to circle/highlight certain words as I read...now, in addition to that, I am also writing in a journal!

This is what each day's entry will consist of:

Reference of the Reading Passage
Summary: Quick overview of what was read
Key: This is a key verse(s) picked from the passage to do further study on
Corresponding: The verses that cross-reference with the key verse
Commentary: The commentary read from for further study
Special: This is the section with the things gleaned from the days reading
Prayer: Three main things to pray for during the day
Memory: Space to work on the weeks memory verse

I have been very much enjoying this and can't wait for the next day's reading!
Have you read the Bible all the way through?
How do get the most out of your Bible reading?

Amanda
"The steps of a good man are ordered by the LORD: and he delighted in his way. Though he fall, he shall not be utterly cast down; for the LORD upholdeth him with his hand." ~ Psalm 37:23-24

Tuesday, January 7, 2014

Purse Accessory Sets...

A good friend of mine had a great idea for gifts to give this past Christmas season...Purse Accessory sets. So, I borrowed her idea, and made some sets to give to some of the lovely ladies on my Christmas gift-giving list. Our sets didn't contain the exact same things...but not all of the sets I gave out even had all the same components, the sets were tailored to the receiver :)

A couple purple sets...
This set included a scarf (not shown), checkbook/2-year planner cover, a small change purse, a key fob, a travel tissue cover, and a to-go cup cozy.
The second purple set included a scarf, a small change purse, travel tissue cover, checkbook/2-year planner cover, and a key fob.

A little more springy...
This smaller set went to my sister, who already had a mug cozy...so, in her purse set, she received a travel tissue cover, a key fob, a small change purse, and a checkbook/2-year planner cover.

I also made a couple other sets that were given out before I remembered to photograph them...but I think you get the idea :) lol

These were so nice to make and a great gift for mailing...light and compact!

Hope your year has started off well, even if it is very cold out in much of the USA :)
Have a good day!

Amanda
"Lord, make me to know mine end, and the measure of my days, what it is; that I may know how frail I am." ~ Psalm 39:4